Practical state machines
State machines are the University’s answer for handling strings. Do they have any practical uses? If you have survived through a course on methods of computation, state machines might have a reaction on you ranging on ’eww’ to ‘wow’. They do have other uses than just passing an exam.
Coffee-driven development 
So what is a state machine? State machines are processes, which read input character by character, changing states on each character based on the machine configuration. The most common example used for benefits of state machines is a regular expression. They can be handled efficiently and relatively easily by using state machines. It is a mistake, however, to think that only streams of characters can be used by state machines.
If we change our state machines so that instead of single characters, our machine can handle arbitrary events, the machine suddenly turns into a really powerful tool for modeling systems. For example, the daily cycle of a developer can be modeled with a state machine. Except for a coffee break at 14:00, a developer writes code until tests pass. After deploying, the deploy either succeeds or fails.

The above state machine has four states; “Active programming”, “Coffee break”, “Production deploy” and “Feature complete”. Active programming can change into either a coffee break on 14:00, or into a production deploy if the tests pass.
Towards real life 
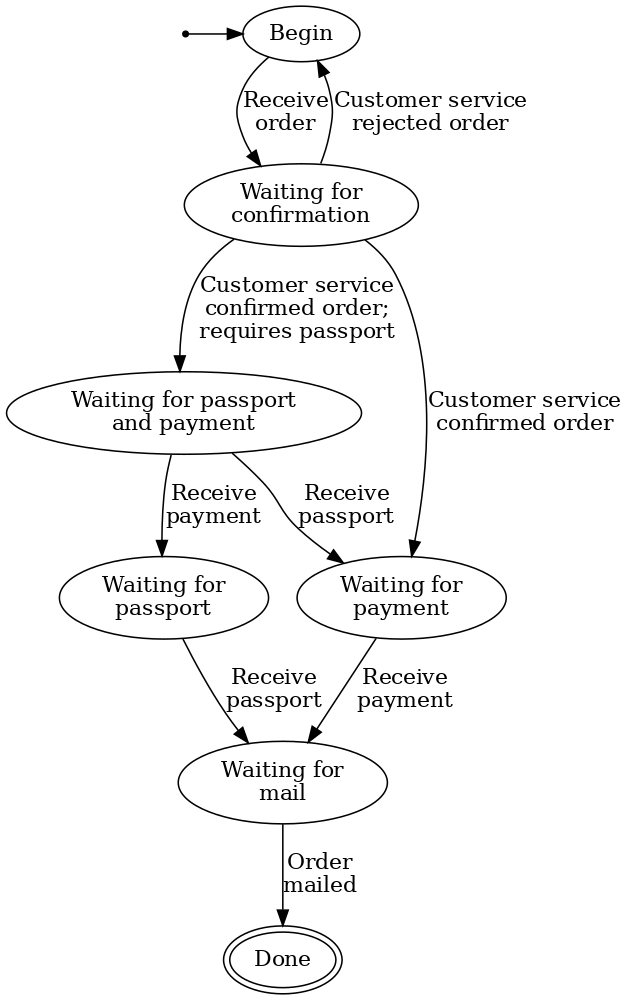
State machines are especially useful for processes, which can be in several states, but with restricted amounts of possible state changes. In the next more-real-life use case, the end-user creates an order, which is first manually confirmed by customer service, with some orders requiring additional passport verification. Every order must be paid. The state changes can be used to manage more complex states. From the picture, it can be easily seen what are the next states for any given state.
Instead of events, state machines can also be used to model choose-your-adventure kind of processes. Instead of working, do you want to work on guessing the correct inputs to Jira so that your ticket can be marked as ‘done’? Jira workflows are state machines, of which usefulness is a separate question.
A bunch of if statements 
Converting the above order process into JavaScript without a state machine results in a piece of code that looks something like this:
function requiresPassport(order) { return order.passport; }
function orderAcceptable(order) { return !!order; }

const defaultState = {
    orderDetails: false,
    orderConfirmed: false,
    orderPaid: false,
    passport: false,
    orderPosted: false,
};

function OrderStatus() {
    const [state, setState] = useState(defaultState);

    if (!state.orderDetails) {
        return <button onClick={() => {
            const orderDetails = {passport: true};
            if (requiresPassport(orderDetails)) {
                setState({...state, orderDetails, orderConfirmed: 'requiresPassport'});
            } else if (orderAcceptable(orderDetails)) {
                setState({...state, orderDetails, orderConfirmed: 'yes'});
            }
        }}>
            Send order
        </button>;
    } else if (state.orderConfirmed === 'requiresPassport' && !state.passport && !state.orderPaid) {
        return <div>
            <button onClick={() => setState({...state, passport: true})}>
                Send passport
            </button>
            <button onClick={() => setState({...state, orderPaid: true})}>
                Send payment
            </button>
        </div>;
    } else if (state.orderConfirmed === 'yes' && !state.orderPaid) {
        return <button onClick={() => setState({...state, orderPaid: true})}>
            Send payment
        </button>;
    } else if (!state.orderPosted) {
        return <button onClick={() => setState({orderPosted: true})}>
            Post order
        </button>;
    } else {
        return "Done!";
    }
}
The code above mixes logic and user interface, which makes the component hard to read and understand. It’s also easy to hide bugs in the code – the above code has at least two. One possible solution would be to hide the logic with eg. Redux. At least the code is relatively simple.
The code also leaves some questions open related to state. What does it mean if
the order has already been posted (so state.orderPosted === true), but the
order hasn’t been paid (state.orderPaid !== true)?
Building a state machine 
So what would this look as a state machine? Let’s try with a
JavaScript/TypeScript library called xstate. Let’s start by looking up the
states. The graph above has the following state:
BeginWaitingForConfirmationWaitingForPassportAndPaymentWaitingForPassportWaitingForPaymentWaitingForMailDone
Let’s start from the more simple states and state transfers, where the machine
just waits for some event and then moves to the next state. For example the
WaitingForPassport state is simply waiting for the ReceivePassport event
after which the machine transfers to the state WaitingForMail.
import { createMachine, interpret, assign } from 'xstate';

const WaitingForPassportAndPayment = {
    on: {
        ReceivePassport: 'WaitingForPayment',
        ReceivePayment: 'WaitingForPassport',
    }
};

const WaitingForPassport = {
    on: { ReceivePassport: 'WaitingForMail' }
};

const WaitingForPayment = {
    on: { ReceivePayment: 'WaitingForMail' }
};

const WaitingForMail = {
    on: { MailOrder: 'Done' }
};

const Done = { type: 'final' };
More complex transfers are from the states WaitingForConfirmation and
Begin. In the first one, the machine has to make a conditional transfer. If
the order requires a passport, the machine should go to the
WaitingForPassportAndPayment state, but if not, it should go to the
WaitingForPayment state. The function in the cond key takes in the context
of the machine, where we should have an order field with the details of the
order.
const WaitingForConfirmation = {
    always: [
        { target: 'WaitingForPassportAndPayment', cond: ({ order }) => requiresPassport(order) },
        { target: 'WaitingForPayment', cond: ({ order }) => orderAcceptable(order) },
        { target: 'Begin' },
    ]
};
In the Begin state, we save the order which comes with the ReceiveOrder event.
const Begin = {
    context: {},
    on: {
        ReceiveOrder: {
            target: 'WaitingForConfirmation',
            actions: assign({
                order: (_context, ev) => ev.order
            })
        }
    }
};
Now that we have created all of the states, we can combine them into a state machine.
const orderMachine = createMachine({
    id: 'Order handler',
    initial: 'Begin',
    context: {},
    states: {
        Begin,
        WaitingForConfirmation,
        WaitingForPassportAndPayment,
        WaitingForPassport,
        WaitingForPayment,
        WaitingForMail,
        Done
    }
});
We can use this for example with React. The code now has separated state management and user interface, otherwise the code looks pretty much the same as the original code.
import { useMachine } from '@xstate/react';

function OrderStatus() {
    const [state, send] = useMachine(orderMachine);
    switch (state.value) {
        case 'Begin':
            return <button onClick={() => send({type: 'ReceiveOrder', order: {passport: true}})}>
                Send order
            </button>;
        case 'WaitingForConfirmation':
            return 'Order needs confirmation from customer service, please wait';
        case 'WaitingForPassportAndPayment':
            return <div>
                <button onClick={() => send('ReceivePassport')}>
                    Send passport
                </button>
                <button onClick={() => send('ReceivePayment')}>
                    Send payment
                </button>
            </div>;
        case 'WaitingForPassport':
            return <button onClick={() => send('ReceivePassport')}>
                Send passport
            </button>;
        case 'WaitingForPayment':
            return <button onClick={() => send('ReceivePayment')}>
                Send payment
            </button>;
        case 'WaitingForMail':
            return <button onClick={() => send('MailOrder')}>
                Post order
            </button>;
        default:
            return "Done!";
    }
}
Testing 
Unlike the original solution, we can now test the state changes without React.
import {interpret} from 'xstate';

it('Should wait for passport and payment when receiving an order', () => {
  const actualState = fetchMachine.transition('Begin', { type: 'ReceiveOrder', order: {passport: true} });

  expect(actualState.matches('WaitingForPassportAndPayment')).toBeTruthy();
});

it('Should reach Done on a proper sequence of inputs', (done) => {
    const fetchService = interpret(fetchMachine).onTransition(state => {
        if (state.matches('Done')) {
            done();
        }
    });
    fetchService.start();
    fetchService.send({type: 'ReceiveOrder', order: {passport: true}});
    fetchService.send("ReceivePassport");
    fetchService.send("ReceivePayment");
    fetchService.send("MailOrder");
});
Conclusion 
We doubled the lines of code compared to the “trivial” solution. Using the
state machine requires understanding of both how a state machine works and how
the xstate library works. We do receive some benefits, namely the state
machine forces the process to work as specified. Testing the system is easier,
as the logic can be separated as its own service.
State machines model state and state transfers. They are excellent for problems, which can be formulated as event-based systems. State machines, however, are not a solution for every problem, and instead they should be thought as a single tool amongst other tools for system modeling. The best tool always depends on the problem!