Inverse Kinematics with Python
Traditionally video games have handled animations by first drawing animations frame by frame, starting from old games with two or three frames for moving and gradually increasing the number of frames in order to make the animations smoother. Eventually with customers looking for increased realism, developers and artists started creating animations procedurally rather than using a pre-drawn set of animations. This enabled creating features like ragdolls, which have since then become a staple in 3D games. Further development into procedural animation has enabled making even more immersive games, with features like characters placing their hands onto nearby walls when walking.
In an unrelated industry, many similar topics have been already been researched. How a hand should be positioned in order to touch the wall is solved by the same math as how a robotic arm should be positioned in order to drive a screw in. This particular area of math is called inverse kinematics, which asks to what angles a set of joints should be set for a robotic arm to touch the desired point. This blog post implements a simple algorithm called Cyclic Coordinate Descent (or CCD) which numerically approximates the joint angles.
Math 
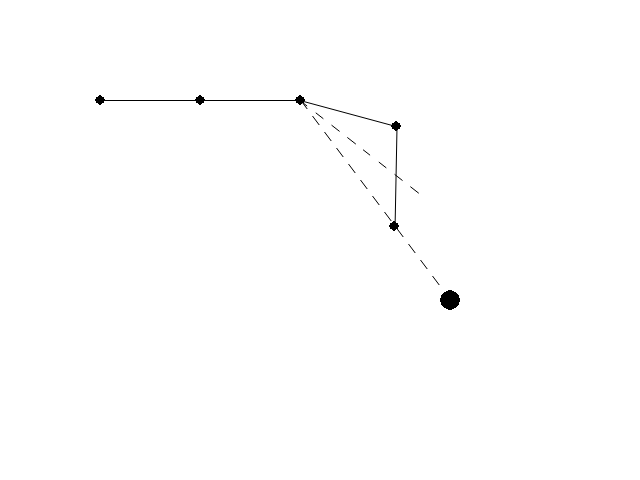
CCD approximates the correct joint angles by going over every joint starting from the “palm” joint and adjusting the joint angle, so that the target point is located within the line going from the angle to the palm. With a few iterations, the resulting approximation is pretty good.
We’ll be using PyGame for visualizations, which will also take care of most of the actual math. The only thing we have to think about is what vectors to rotate.
A quick primer in vector math: In our use case vectors are essentially objects
containing two numbers, x length and y length. Adding two vectors together
results in a third vector with the x and y components added together.
Negating a vector (or multiplying by -1) results in each component being
negated.
These can be visualized pretty easily. In the following graph, a, b and c
are vectors while α is the angle between a and b. If you add b and c
together, you get a. Similarly, if you remove b from a, you get c.

With PyGame, these can be easily computed.
from pygame.math import Vector2

a = Vector2(200, -100)
b = Vector2(200, 100)
c = a - b # or Vector2(0, -200)
alpha = a.angle_to(b)
Solving the angles 
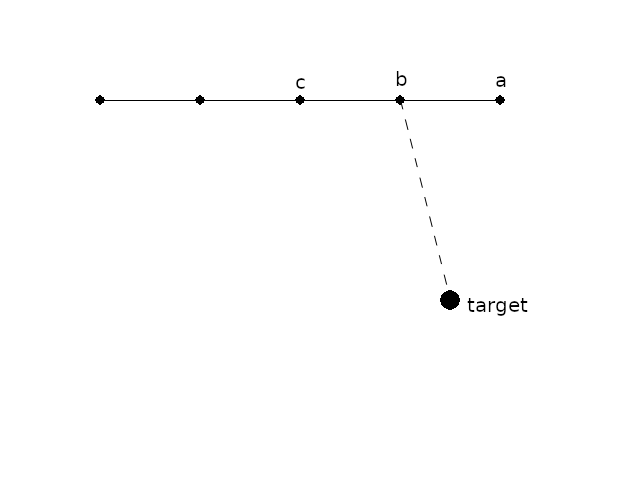
In this picture, we need to first rotate a around b, so that the line
between a and b points towards the target. After that, we need to rotate
a and b around c, so that the line between a and c points towards the
target.
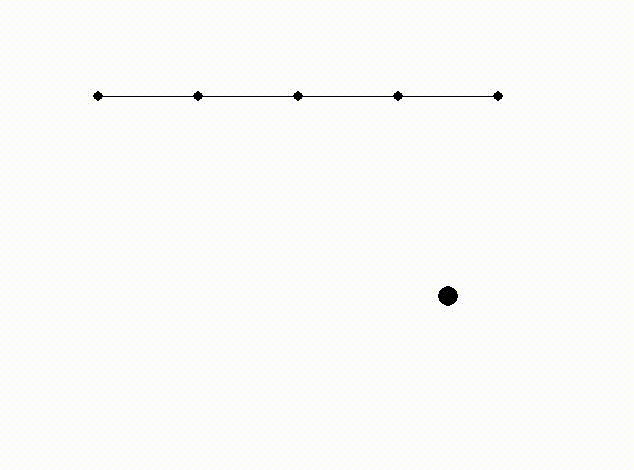
Let’s start off by defining the points and the target. Since we are going to rotate stuff, let’s store the points as relative coordinates and a set of angles.
points = list(map(Vector2, [(100, 100), (200, 100), (300, 100), (400, 100), (500, 100)]))
target = Vector2(450, 300)

rel_points = []
angles = []

for i in range(1, len(points)):
    rel_points.append(points[i] - points[i-1])
    angles.append(0)
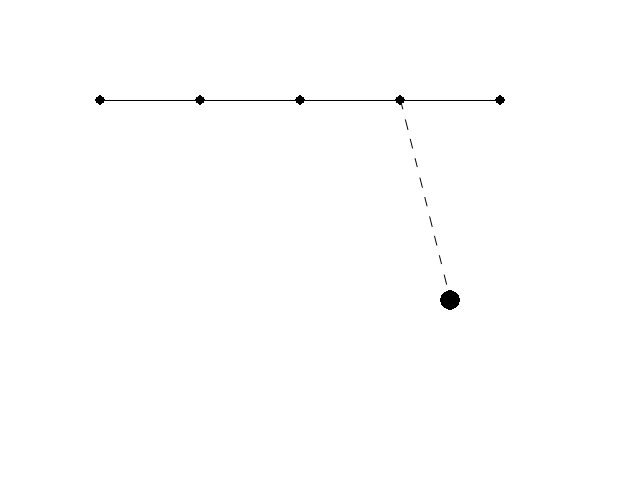
Let’s consider the simple case first. When we are trying to adjust the
a-b-target angle, we want to rotate a around b. Essentially, we want to
change the current angle to 0.
i = len(points)-2 # second-to-last index
endpoint = a
current_point = b

angle = (endpoint-current_point).angle_to(target-current_point)
angles[i] += angle
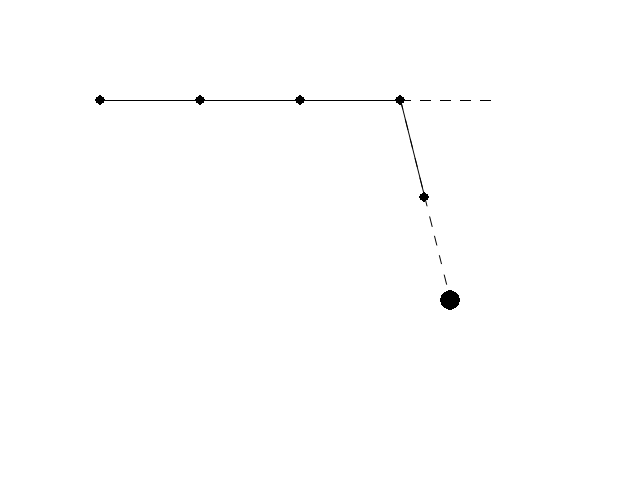
What about the second iteration, when we are rotating a and b around c?
i = len(points)-3 # third-to-last index
endpoint = a - rel_points[len(points)-1] + rel_points[len(points)-1].rotate(angles[i+1])
current_point = b

angle = (endpoint-current_point).angle_to(target-current_point)
angles[i] += angle
The code is identical except for calculating the position of the endpoint. Let’s generalize it to a function:
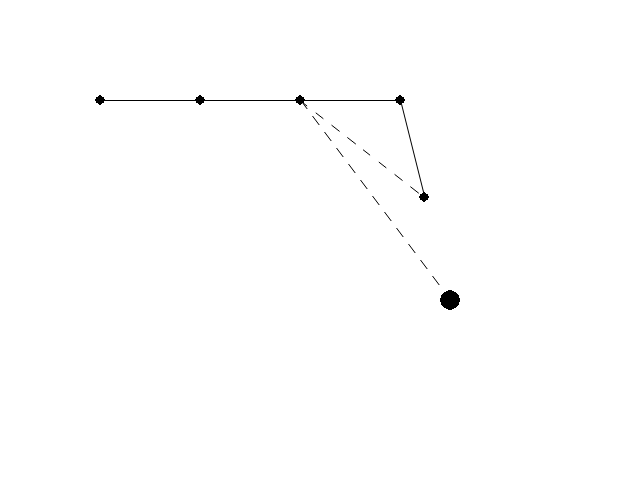
def solve_ik(i, endpoint, target):
    if i < len(points) - 2:
        endpoint = solve_ik(i+1, endpoint, target)
    current_point = points[i]

    angle = (endpoint-current_point).angle_to(target-current_point)
    angles[i] += angle

    return current_point + (endpoint-current_point).rotate(angle)
This function recursively goes through the points, starting from the last point and moving backwards. Every time it updates one angle, it rotates the endpoint around the just-updated angle.
Rendering 
PyGame makes rendering things easy, the drawing code almost looks like pseudocode. We simply render every point and draw straight lines between them.
def render():
    black = 0, 0, 0
    white = 255, 255, 255

    screen.fill(white)
    for i in range(1, len(points)):
        prev = points[i-1]
        cur = points[i]
        pygame.draw.aaline(screen, black, prev, cur)
    for point in points:
        pygame.draw.circle(screen, black, (int(point[0]), int(point[1])), 5)
    pygame.draw.circle(screen, black, (int(target[0]), int(target[1])), 10)
    pygame.display.flip()
Let’s wrap the program in a small loop, where we update the point positions after solving the appropriate angles:
import sys, pygame
pygame.init()

size = width, height = 640, 480
screen = pygame.display.set_mode(size)

while 1:
    for event in pygame.event.get():
        if event.type == pygame.QUIT: sys.exit()

    solve_ik(0, points[-1], target)

    angle = 0
    for i in range(1, len(points)):
        angle += angles[i-1]
        points[i] = points[i-1] + rel_points[i-1].rotate(angle)

    render()
    pygame.time.wait(int(1000/60))
With this code, the angles converge almost instantly to an acceptable range.

Making it better 
Let’s do small adjustments to make this look better. Let’s make the target move around so that the angles need to be constantly adjusted, and at the same time limit the amount a joint can move per frame, so the movement looks more natural.
Moving the ball around is simple, just move it with constant speed in every frame and reverse the direction if it hits a wall.
target_speed = Vector2(3, 3)
#...
target += target_speed
if target.x <= 0 or target.x >= width:
    target_speed.x = -target_speed.x
if target.y <= 0 or target.y >= height:
    target_speed.y = -target_speed.y
Limiting angular momentum is also pretty simple, just determine the rotation direction and limit it to some constant.
angles[i] += min(max(-3, angle), 3)
Summary 
Inverse kinematics drive calculations like “How can I make this arm touch this ball?”, while Python and PyGame enable implementing small simulations easily. These can be further combined with other techniques to create more lifelike games. For further examples, see this walking spider demo and this talk about Overgrowth, both using inverse kinematics for procedural animation.
Check out the code behind this blog post at GitHub.